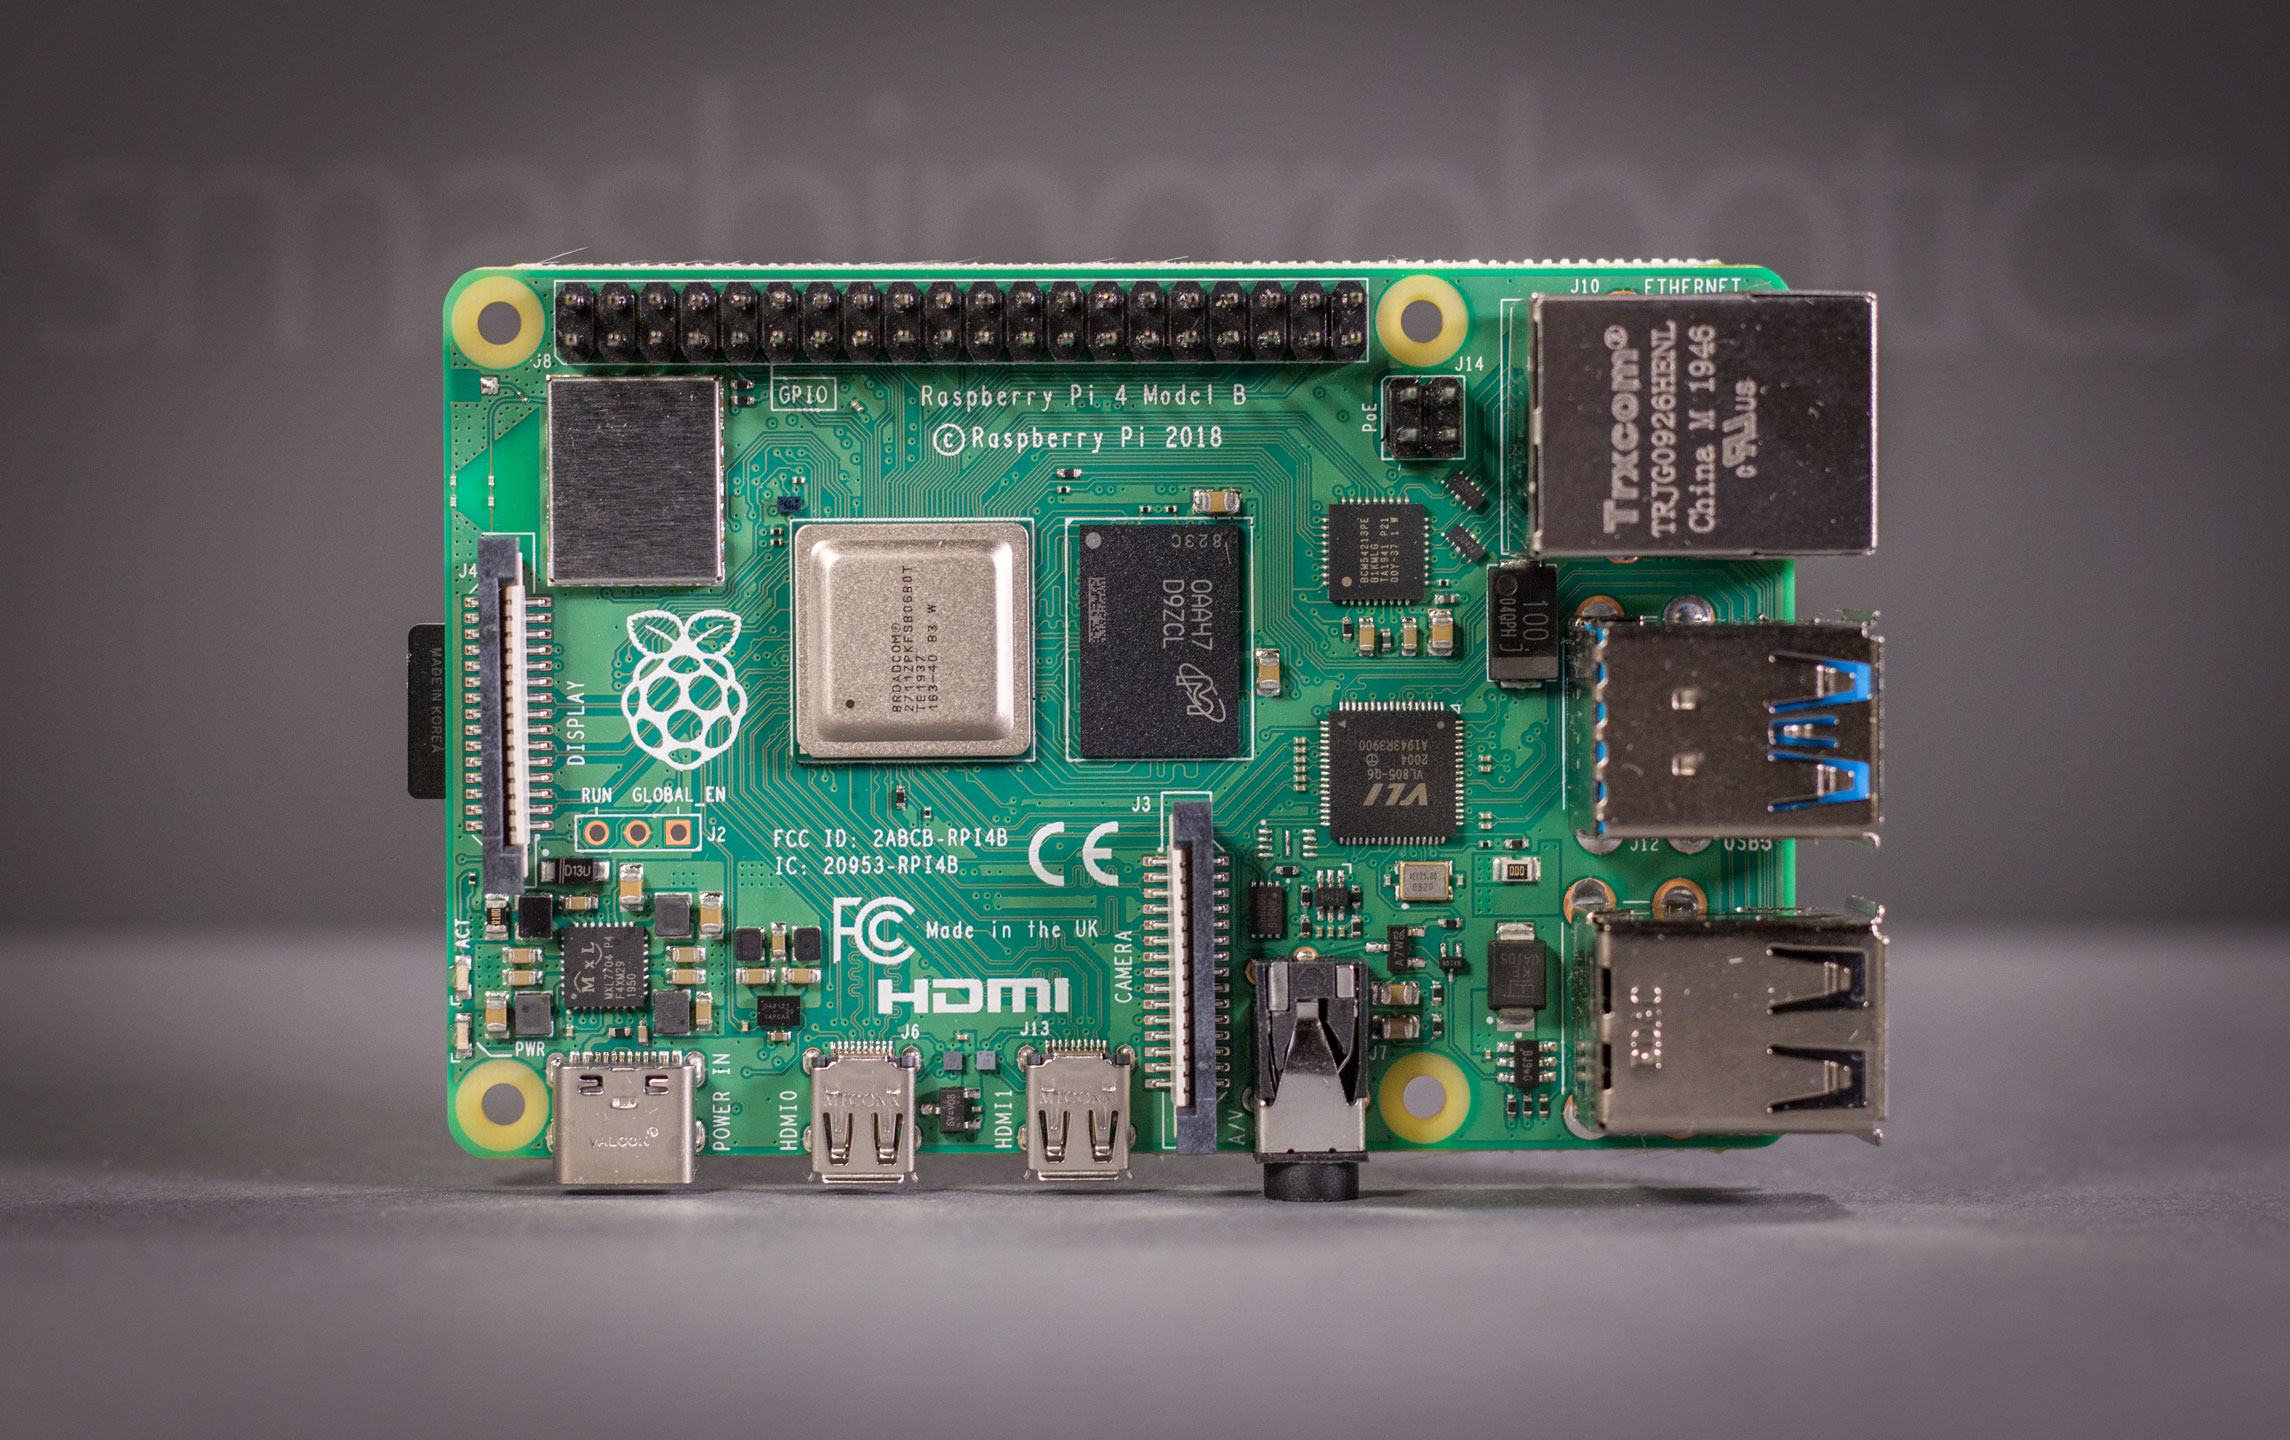
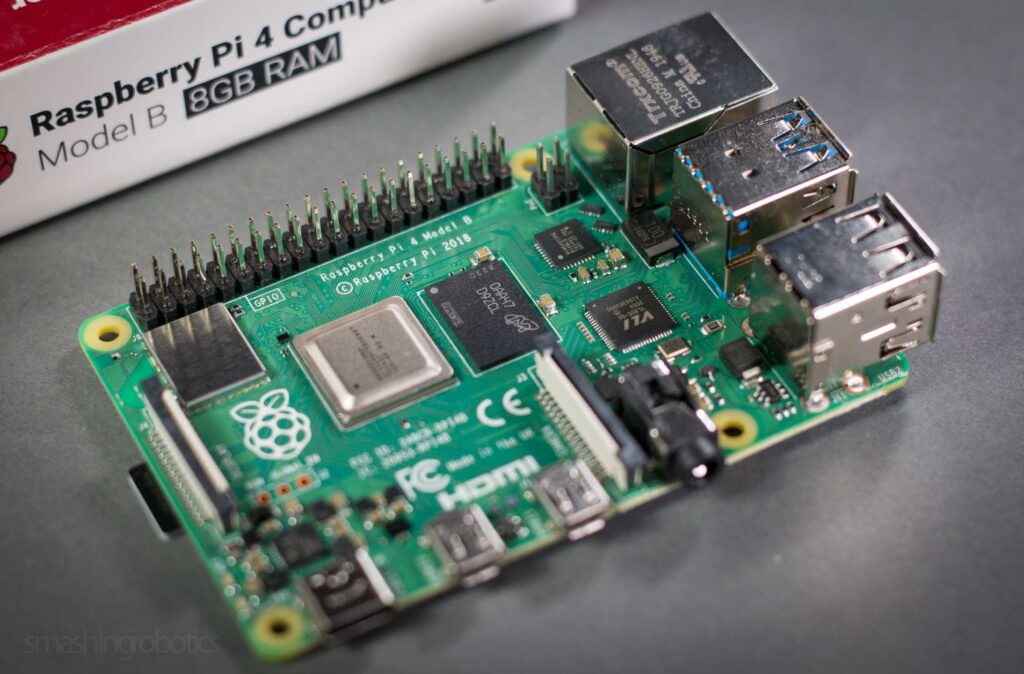
The Raspberry Pi 4 model B is the latest of this very popular series of single-board computers. Gigabit Ethernet, lots of RAM, HEVC video decoding or USB 3.0 and similar entry price point as before add great value to the platform.
Of course the figures seem very interesting so today I will go through these eye-catching features. I will also explore a few tweaks which can improve general user experience. Just like in my Pi 3 vs Pi 2 comparison the new Raspberry Pi 4 8 GB and 4 GB RAM boards will undergo some common workflow tests. Also synthetic performance figures alongside other boards will help getting a better perspective on the results.
Raspberry Pi 4 model B specifications
- Quad-core Broadcom BCM2711 Cortex-A72 (ARM v8) 64-bit SoC @ 1.5 GHz
- VideoCore VI GPU @ 500 MHz
- 1 GB, 2 GB, 4 GB or 8 GB LPDDR4-3200 SDRAM
- Dual band Wi-Fi 2.4/5.0 GHz IEEE 802.11ac, Bluetooth 5.0, Bluetooth LE
- Gigabit Ethernet port
- H.265 (HEVC) – 4kp60 decode, H.264 – 1080p60 decode, 1080p30 encode
- OpenGL ES 3.0 support
- 2 x micro-HDMI ports (up to 4K60p support)
- 4 x USB ports: 2 x USB 3.0 and 2 x USB 2.0
- Raspberry Pi standard 40-pin GPIO header (fully backward compatible)
- 2-lane MIPI DSI display port
- 2-lane MIPI CSI camera port
- 4-pole 3.5 mm jack for stereo audio and composite video
- Micro-SD card slot
- 4-pin Power over Ethernet (PoE) header
- 5V DC/3A over USB-C power connector
For more context you can check out specs for previous iterations such as the Raspberry Pi 3 or even the Pi 2.
Hardware design and new features
The new Pi 4 model B board sports a more powerful Cortex-A72 quad-core SoC with improved graphics while retaining the small form factor that made this development platform famous.
Based on memory size there are 1, 2 and even 4 or 8 GB RAM configurations, the latter of which we are taking a look at today. Worth emphasizing is that the starting price point for the base Pi 4 configuration is similar to previous versions. You will need to fork about 35% extra for the top 4 GB variant. The 8 GB version costs almost twice the amount of the 2 GB version.
The Gigabit Ethernet interface is no longer sharing bandwidth with the USB ports as it was the case with the Pi 3 B+. This means that in theory maximum bandwidth should be attainable.
There are now two USB 3.0 ports on-board offering extra bandwidth should it come to need.

Raspberry Pi 4 Model B board with 8 GB RAM
Backward compatibility is retained in key aspects
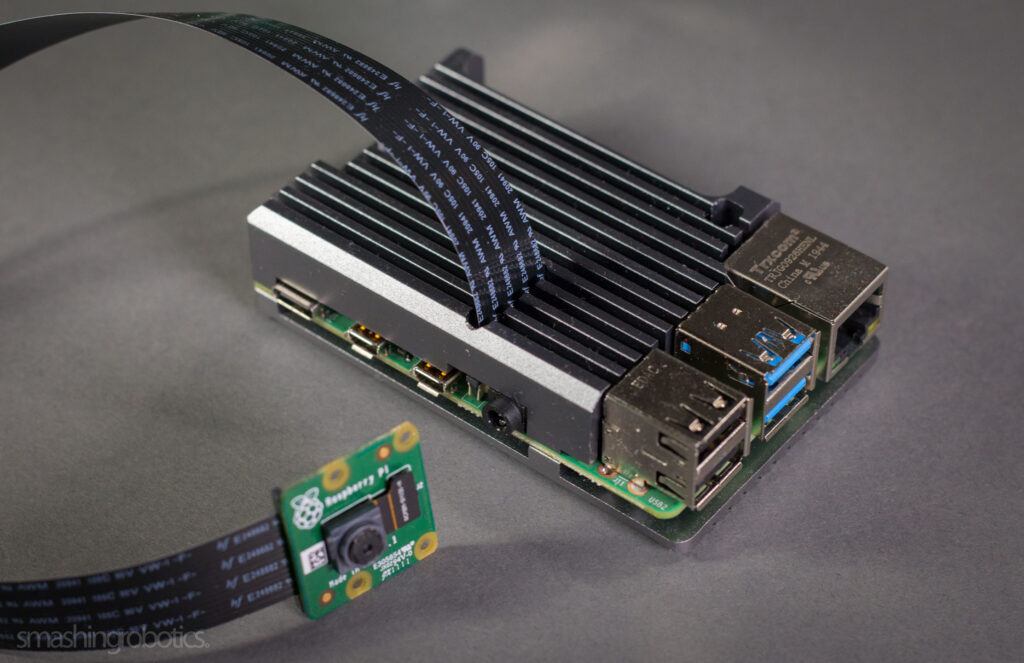
In theory all Raspberry Pi accessories, such as HATs, cameras or displays should work since the 40 pin header is fully backward compatible. Also the serial display and camera (DSI, CSI) ports are still there.
I have tested the Raspberry Pi Sense HAT and Camera with the new Pi 4 as well as some older projects with no issues whatsoever.
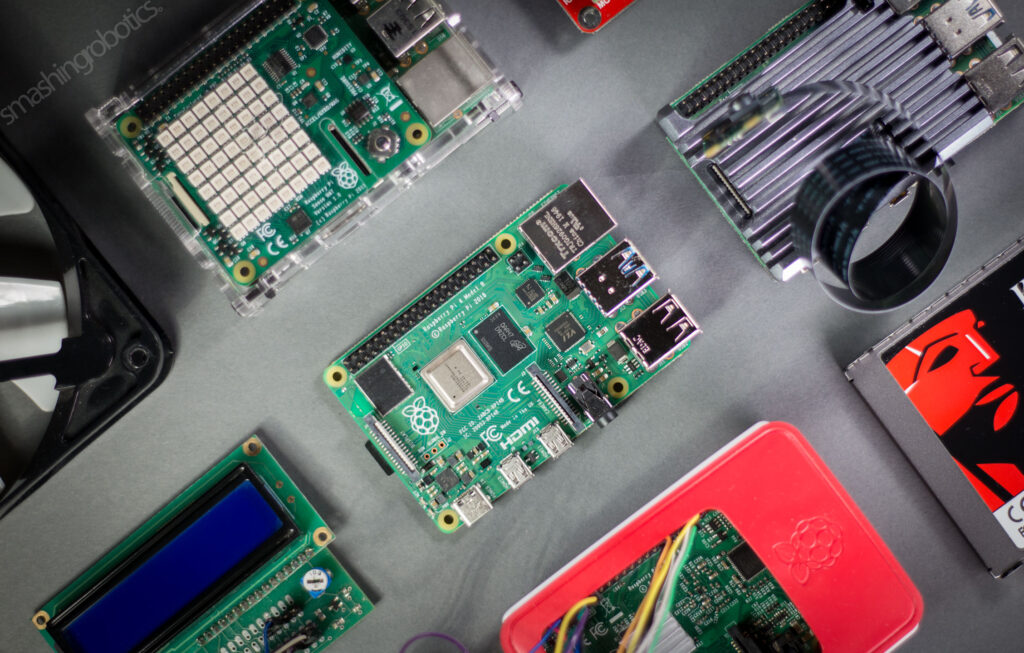
Raspberry Pi 4 board and peripherals
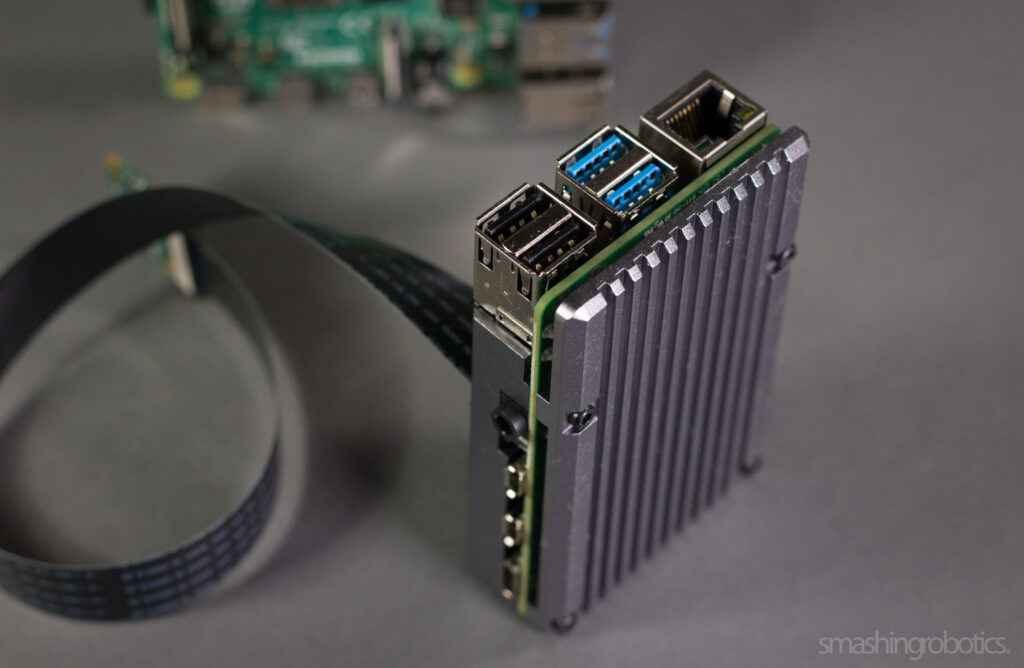
Physical differences can be found in the area of Ethernet and USB ports which are now placed in reverse order. This means that most older enclosures might not properly accommodate the new board.
You might need micro-HDMI to HDMI adapters or cables to connect one or two external monitors to your Pi 4.
The power supply port is now USB-C so you might need a new charger or a micro-B to type-C adapter. Most modern accessories already employ USB-C ports so cables and adapters should be fairly ubiquitous.
A few words about cooling
The Pi 4 SoC might get pretty hot when put through CPU intensive tasks. Since the new chips come with an IHS (integrated heat spreader) you could run them without any type of cooling. A simple 15×15 mm passive radiator however is easy to install and does not hurt at all. In most cases it lowers temperature enough to avoid CPU throttling.
On my Pi 4 boards right out of the box I’ve seen temperatures rise up to 90 degrees Celsius during CPU-intensive workflows. With this in mind I decided to equip my boards with heatsinks from the very beginning. A nice addition that I found is the aluminium heat sink case from Pimoroni. This case is a big chunk of metal but it provides lots of cooling power and looks pretty good nonetheless.
Raspberry Pi 4 model B with Pimoroni Heatsink Raspberry Pi 4 model B with Pimoroni Heatsink
Desktop experience on the Raspberry Pi 4
The Raspberry Pi OS (yes, it’s no longer called Raspbian) has also evolved and comes with lots of software already installed. Doing development or productivity activities straight from your Pi has definitely become an option. Unfortunately it still is a 32-bit OS so it will not take full advantage of the new hardware onboard.
From the Raspberry Pi downloads section, you can download the latest NOOBS or only the RPi OS desktop image. Simply copy this onto a microSD card using Balena Etcher or otherwise and you’re good to go.
The new Pi 4 feels snappier than its predecessors. Browsing is greatly improved and many resource-intensive websites are actually loading now. Even YouTube clips are playing reasonably enough at 720p resolution. One might even hope for some 1080p playback and the extra RAM in top configurations makes a difference up to a point.
You can even do some light 3D modeling work with Blender or similar programs, and retro gaming is handled with ease by the new boards.
A few simple tweaks
There are several simple tweaks which you can apply for improving your experience.
First please make sure the improved OpenGL desktop driver is enabled.
This can be accomplished by launching the raspi-config utility from Terminal and selecting the “Fake KMS driver” option. Also you can directly edit the config.txt file, adding dtoverlay=vc4-fkms-v3d at the end of it.
A very good explanation for this aspect can be found in this Raspberry Pi forum thread.
Another easy tweak is GPU memory size. The amount of RAM is more than enough in the top Raspberry Pi 4 variants so it might be worth increasing the video RAM.
My settings would be gpu_mem=256 or 384, however I need to explore this parameter further. This article from the Raspberry Pi documentation explains this setting.
Last but not least let’s not forget about the mouse lag issue. As explained in this Raspberry Pi forum thread this is actually by design, the idea being to limit the update speed in certain cases to prevent the GUI from lagging when “gaming” mice are used .
To accomplish this simply add usbhid.mousepoll=0 to /boot/cmdline.txt at the end of the existing line and reboot.
Running from an USB 3.0 SSD greatly improves performance
Note: the boot from USB feature will be supported officially very soon so this topic will be revisited.
At the time of writing I referred to this excellent guide for modifying the boot partition in order to boot from a standard SSD connected via USB 3.0.
The basic idea would be to clone your OS partition onto a SSD and then changing the OS partition ID (PARTUUID) from /boot/cmdline.txt located on your microSD card with the PARTUUID of the SSD partition.
Even with an old SSD (about 500 MB/s read/write) performance gains are notable. The Pi 4 feels even more snappier in most types of tasks, from simple browsing to launching more resource-intensive programs.
Overclocking the Raspberry Pi 4
Overclocking is a relatively trivial task, however please be aware that this might void the warranty of your Raspberry Pi board so proceed at your own risk.
Also please take note that should you overclock your Pi 4 you need to add at least a passive cooling solution. An active cooler or at least a fan creating airflow over the board would be ideal.
There are several good articles on how to take your Pi 4 to the limit. From a certain point performance gains are minuscule compared to the effort to get them, not to mention stability issues that might appear.
Please check beforehand that all your software and firmware is up-to-date by running sudo apt update && sudo apt upgrade commands from the terminal window.
Next all you need to do is to edit your /boot/config.txt file as follows:
#uncomment to overclock the arm. 700 MHz is the default.
over_voltage=8
arm_freq=2000
gpu_freq=650
These are stable settings that worked for me right off the bat. I tried to lower the over_voltage parameter for extra cool running however stability issues appeared. Nevertheless, temperatures seldom raise above 60 degrees Celsius even during prolonged CPU intensive loads.
Both 4 and 8 GB boards behaved similarly, the 2 GHz overclock not raising any stability issues in my case. With the risk of repeating myself, I used passive or active heatsinks at all times, even at stock speeds.
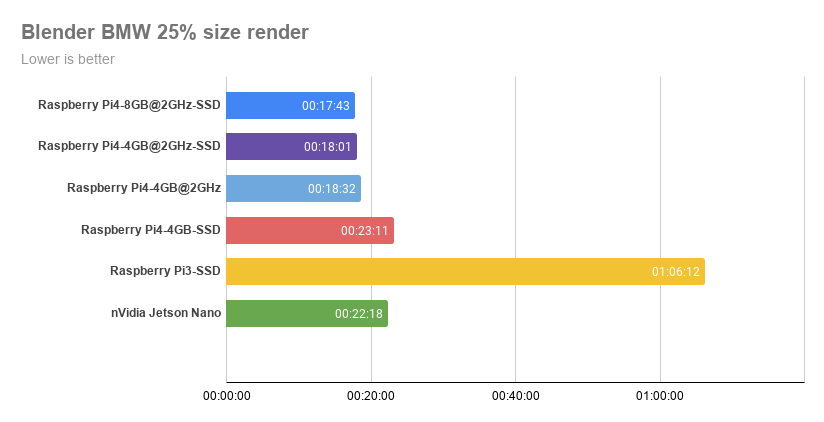
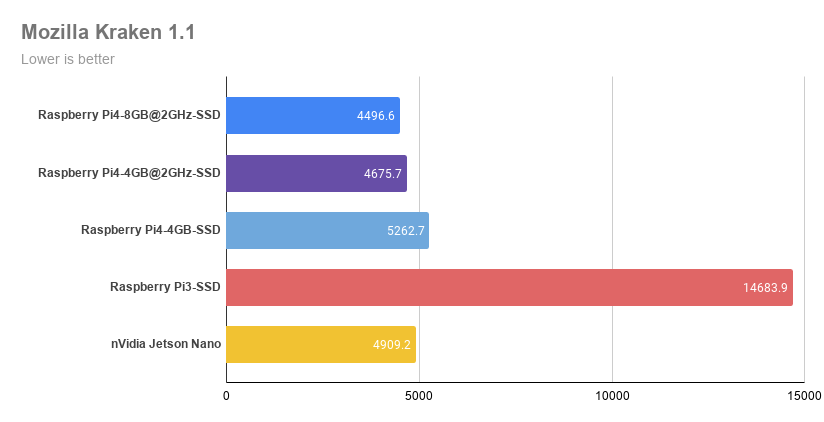
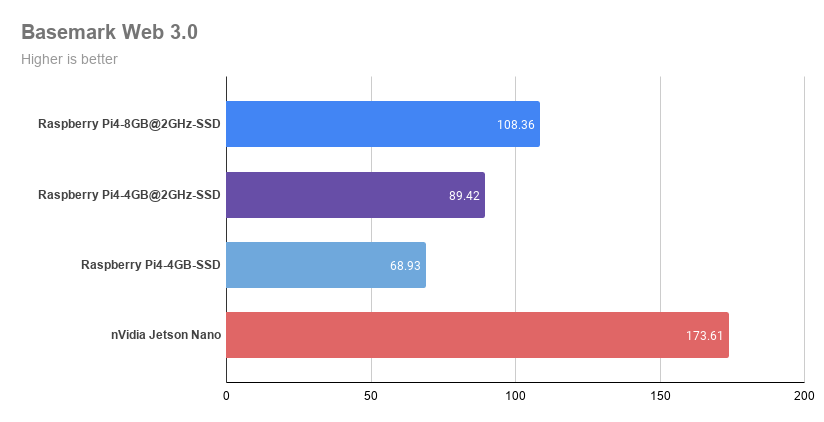
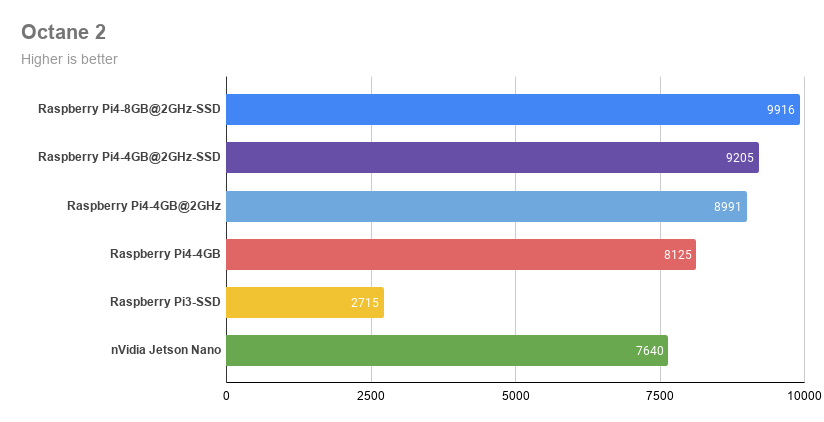
Benchmarks and desktop performance
Below you can find results for various benchmarks, execution times for certain tasks as well as network and storage performance figures. All boards were running their official OSes.
Test configurations for Raspberry Pi 8 GB and 4 GB model B boards:
- stock CPU speed (1.5 GHz);
- overclocked @ 2 GHz;
- OS running from microSD card;
- OS running from SSD.
As mentioned earlier I have added some other boards to the test lineup for reference:
- The Raspberry Pi 3 was the first of the family to offer a 64-bit CPU offering fair performance gains at the time;
- The Nvidia Jetson Nano is geared towards AI workloads sporting a powerful 128 CUDA core GPU. Its ARM Cortex-A57 CPU is slightly less powerful than the one on the Pi 4.
Performance is a topic that deserves a discussion of its own and I will probably revisit it in the future.


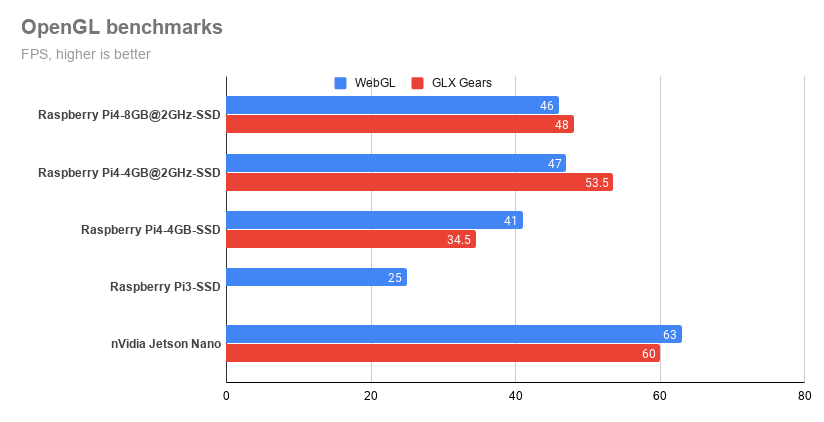
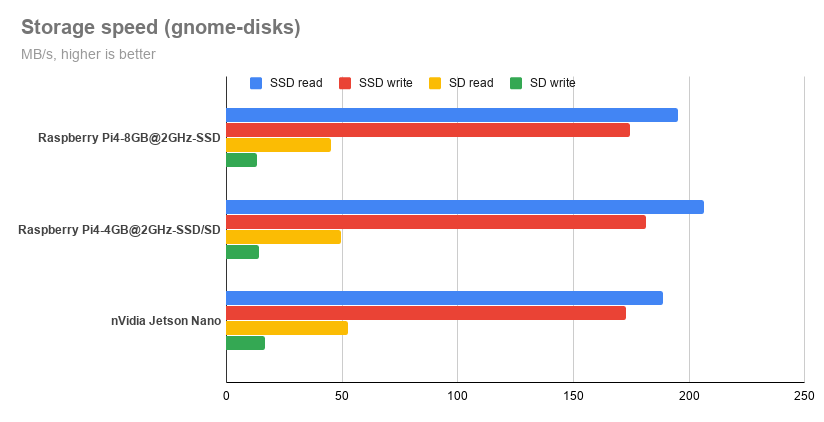
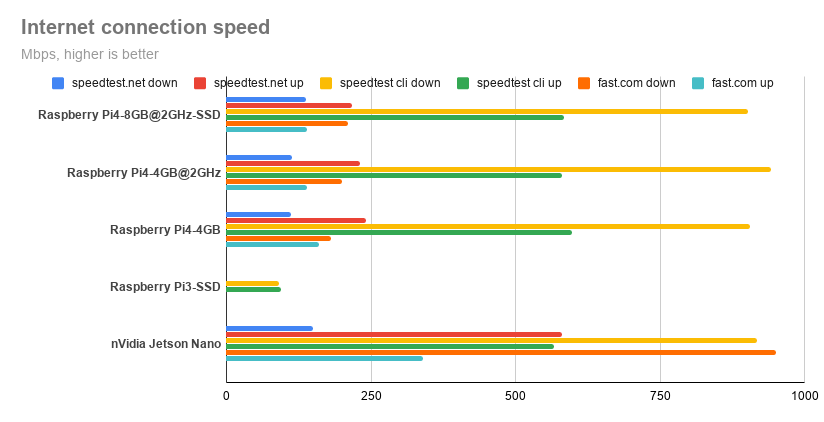
Network and storage speeds

Conclusion
The Pi 4 seems to be a more mature product offering more than adequate processing power and connectivity for IoT, mobile robotics, smart home automation and countless other areas. For extra versatility points Intel Movidius or Google Coral USB accelerators can augment Pi 4’s performance for AI workloads.
On the other hand the official Raspberry Pi OS is still based on a 32-bit kernel, leaving unexplored potential in this tiny computing package. Third party software options are available such as Ubuntu MATE in 32 and 64-bit versions and even a 64-bit Debian port.
A bottleneck in Pi 4’s performance is indeed the microSD card storage. This can be a hindrance in certain types of use cases – e.g. web, network or other types of file servers. On the upside this is a good way to repurpose old SSDs at the price of adding some bulk to the system.
Of course, the main advantage of these boards lies in their popularity. This means you can get help easily, probably your question has already been answered by the massive community around this well-established development platform.